


Hunt groups
Hunt groups are used to ring specific groups of users in a pre-determined pattern within or across locations when a call is made to the Hunt Group telephone number. When your service is set up, Hunt Groups are assigned default settings. However, at the administrator's discretion, the following items can be modified within the admin portal:
- Hunt group profile information
- User assignments
- Settings for call distribution, call forwarding, and business continuity
Modify the hunt group profile
- Log in to the admin portal.
- Select your site from the drop-down menu.
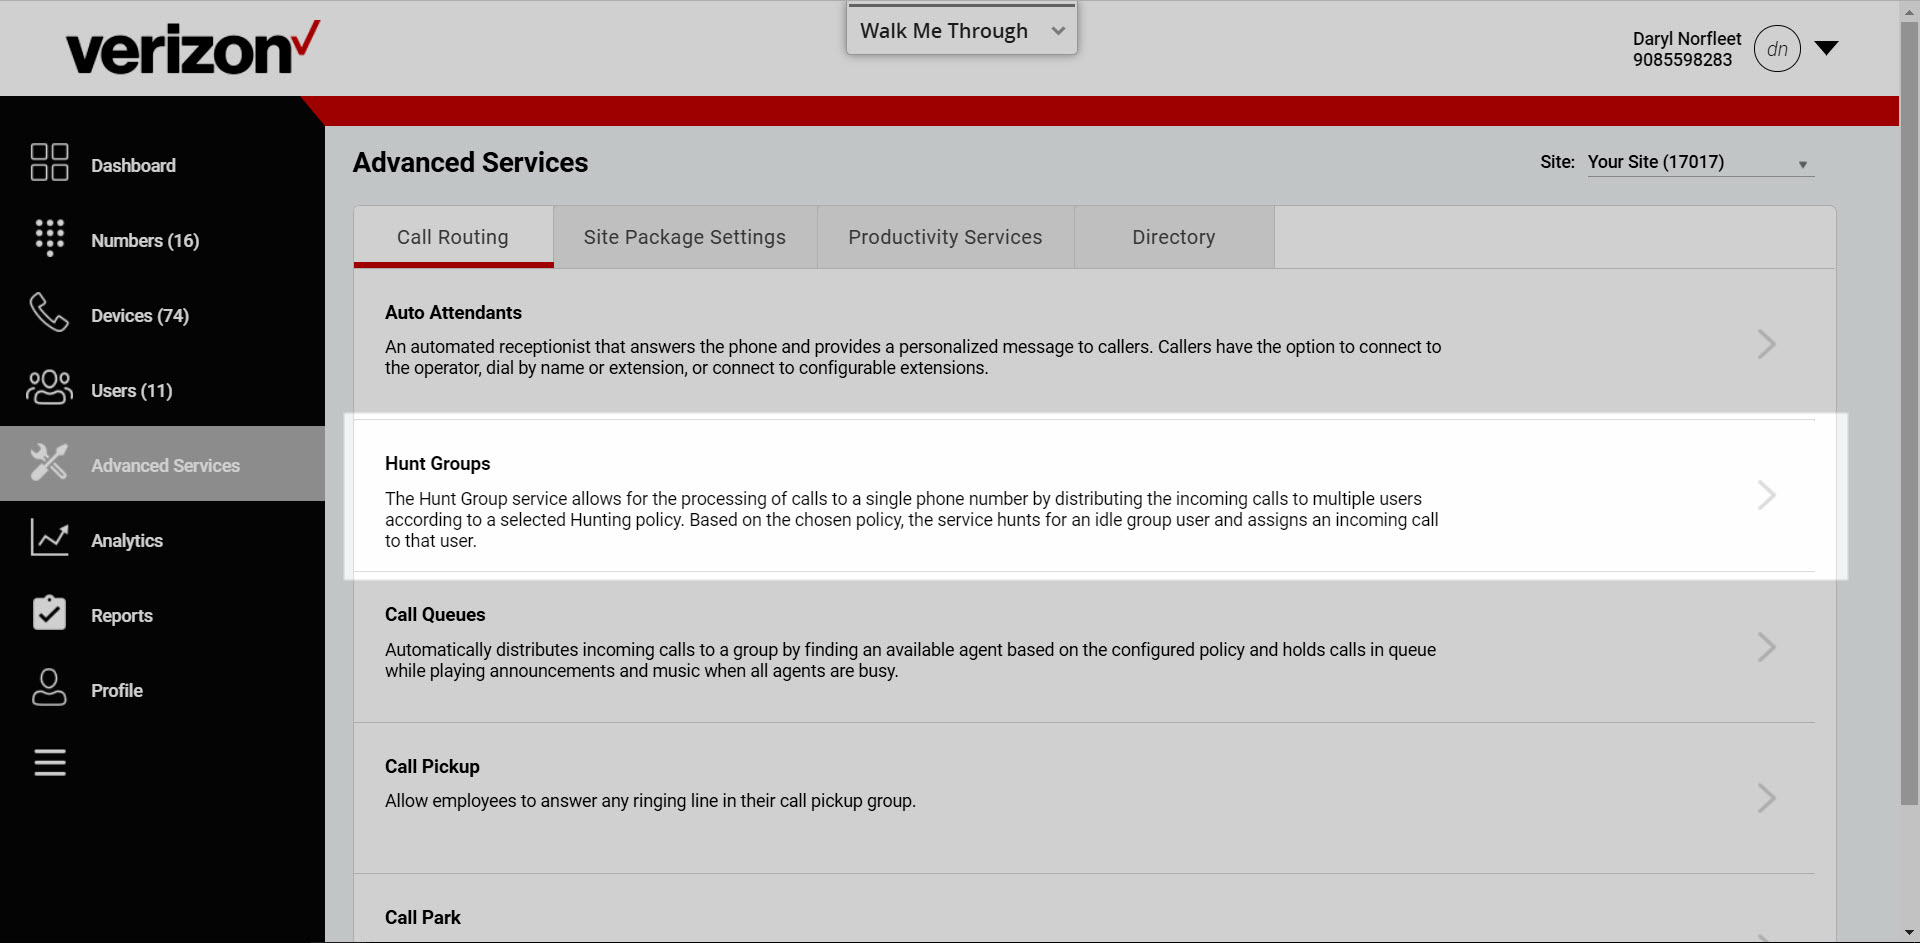
- Select the Advanced Services tab.
- Select Hunt Group under the Call Routing section. Hunt Groups that have been assigned to your account will be listed. By default, the Hunt Group Name field will be populated with the Hunt Group phone number. This is the phone number that callers can dial to reach the Hunt Group. This is also known as the Lead Number. Lead Numbers are assigned during the provisioning process and are determined by working with the site administrator.
- Select the Actions drop-down menu next to the Hunt Group you would like to modify.
- Then select Edit Service. The Edit Hunt Groups page appears.
Configure the hunt group incoming call settings
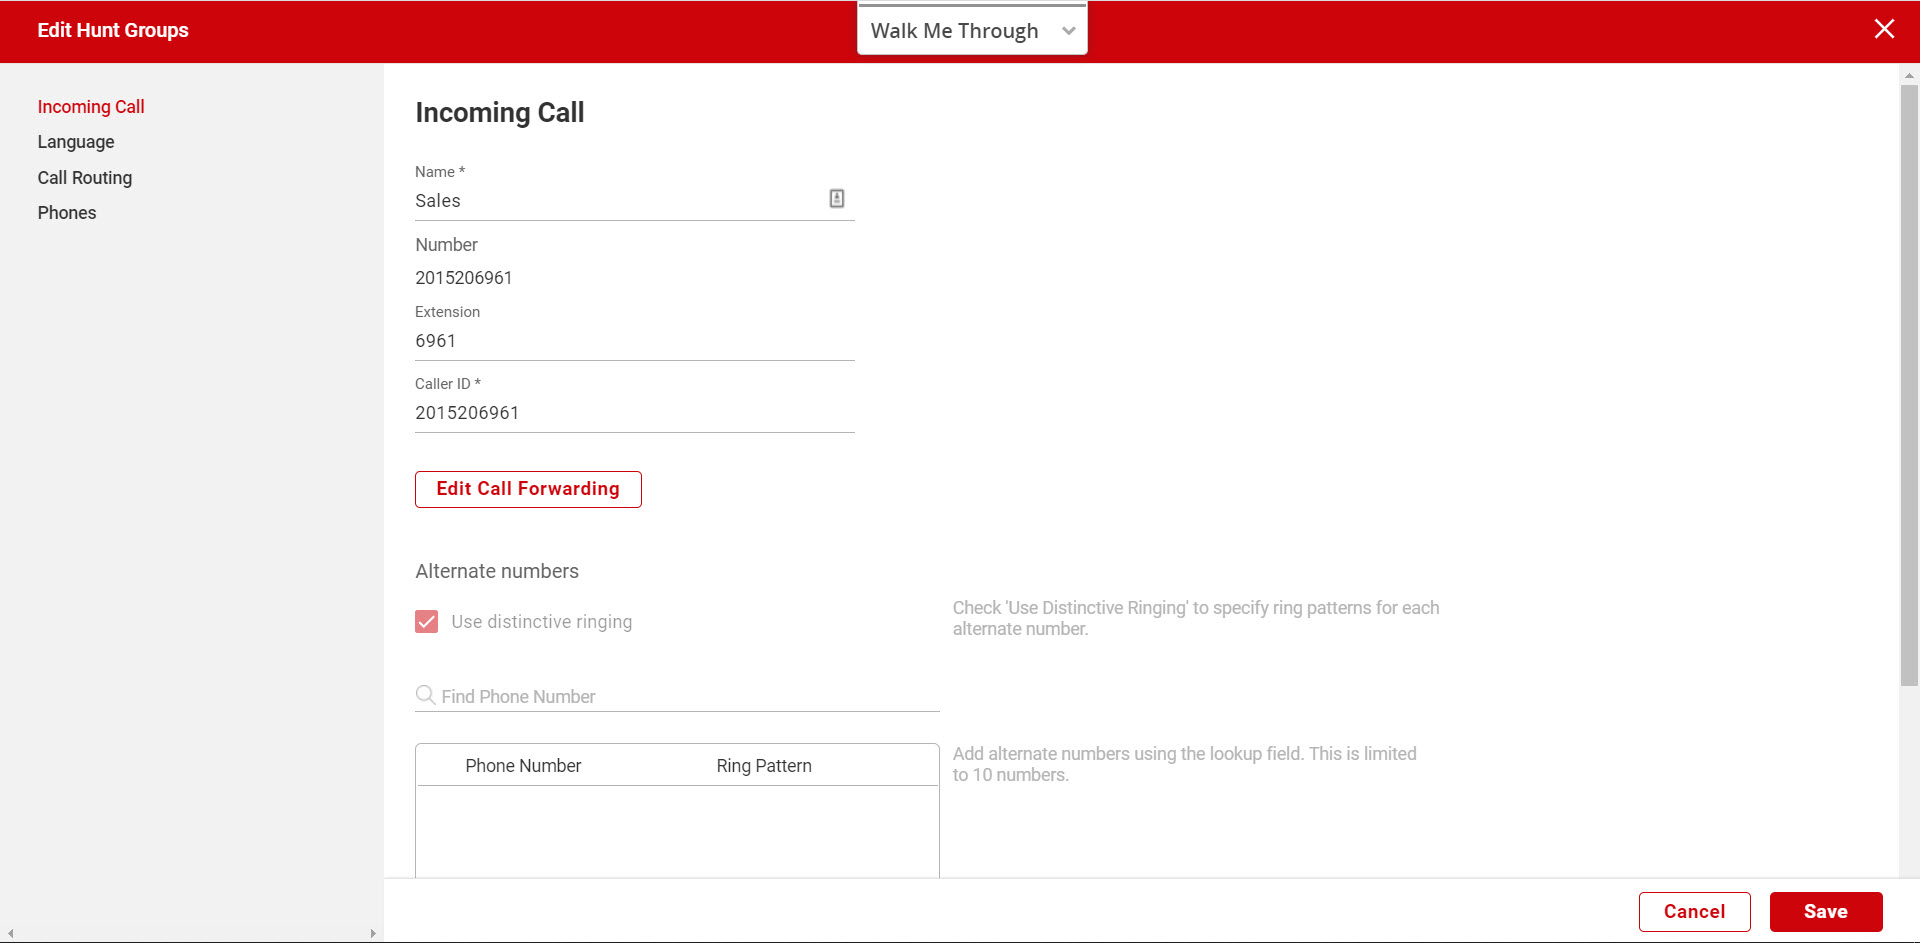
On the Edit Hunt Group page, you can modify the Incoming Call information. You can change the name to something more descriptive. For example, it could represent a description of the users that assigned to the group (e.g., Sales, Customer Service, etc.).
- Enter the Caller ID label. By default, the system prefixes the Hunt Group Inbound Caller ID with the defined “Caller ID Name." For example, “Sales.”
- The System Label, which is made up of the Caller ID Name and the name of the caller, will be presented to a user when receiving a call from the Hunt Group. For example, if the Caller ID Name is modified to “Sales” and “John Smith” is the caller, the label would appear as “Sales – John Smith."
Note: There are no restrictions on the length of your Caller ID Name, but because of some Caller ID space limitations, it’s best to keep it relatively short.
- The System Label, which is made up of the Caller ID Name and the name of the caller, will be presented to a user when receiving a call from the Hunt Group. For example, if the Caller ID Name is modified to “Sales” and “John Smith” is the caller, the label would appear as “Sales – John Smith."
- Modify the Extension assigned to the group, if applicable. Extension-Only Feature Note: If you have the extension-only feature enabled and have assigned the hunt group an extension only, you may not see a phone number assigned here.
Select the hunt group language and timezone
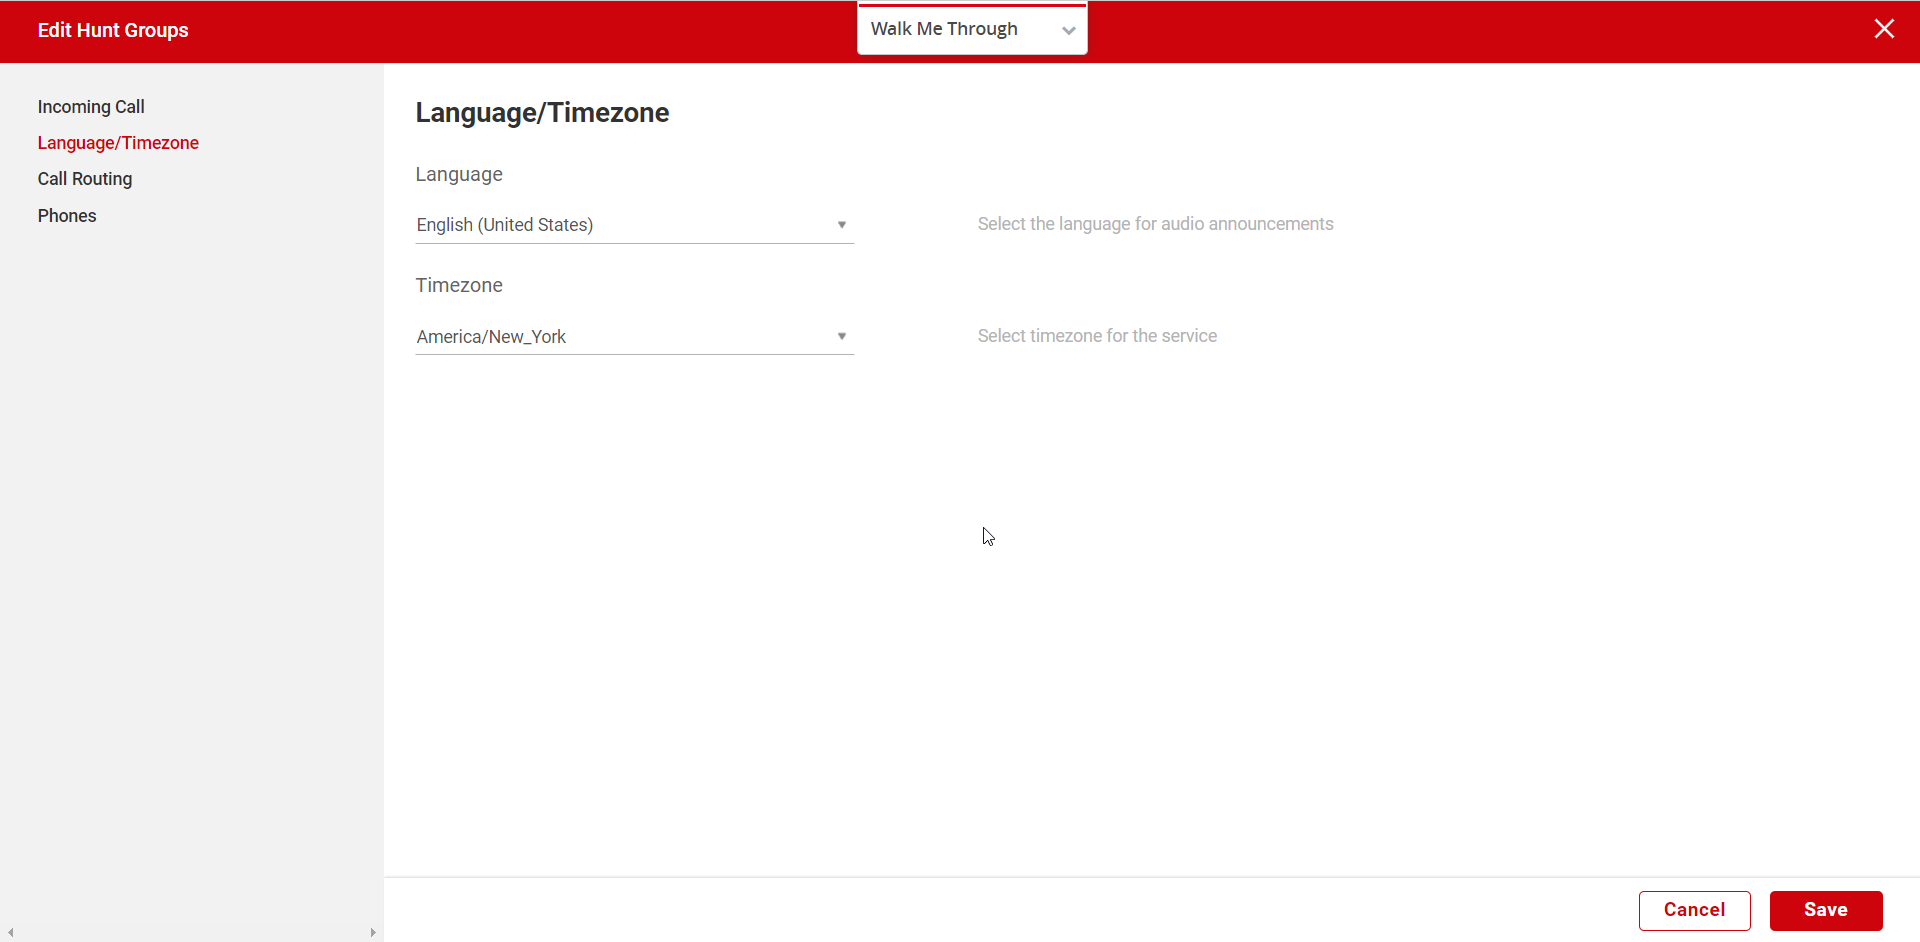
- From the Edit Hunt Group page, select the Language/Timezone tab.
- Under Language, choose the language you’d like to assign the audio announcements for this hunt group.
- Under Timezone, choose the timezone you’d like to assign this hunt group.
- Select Save to save your changes.
Assigning the call routing policy
- Call Routing defines ring patterns establishing the order in which calls are delivered to the users in the Hunt Group.
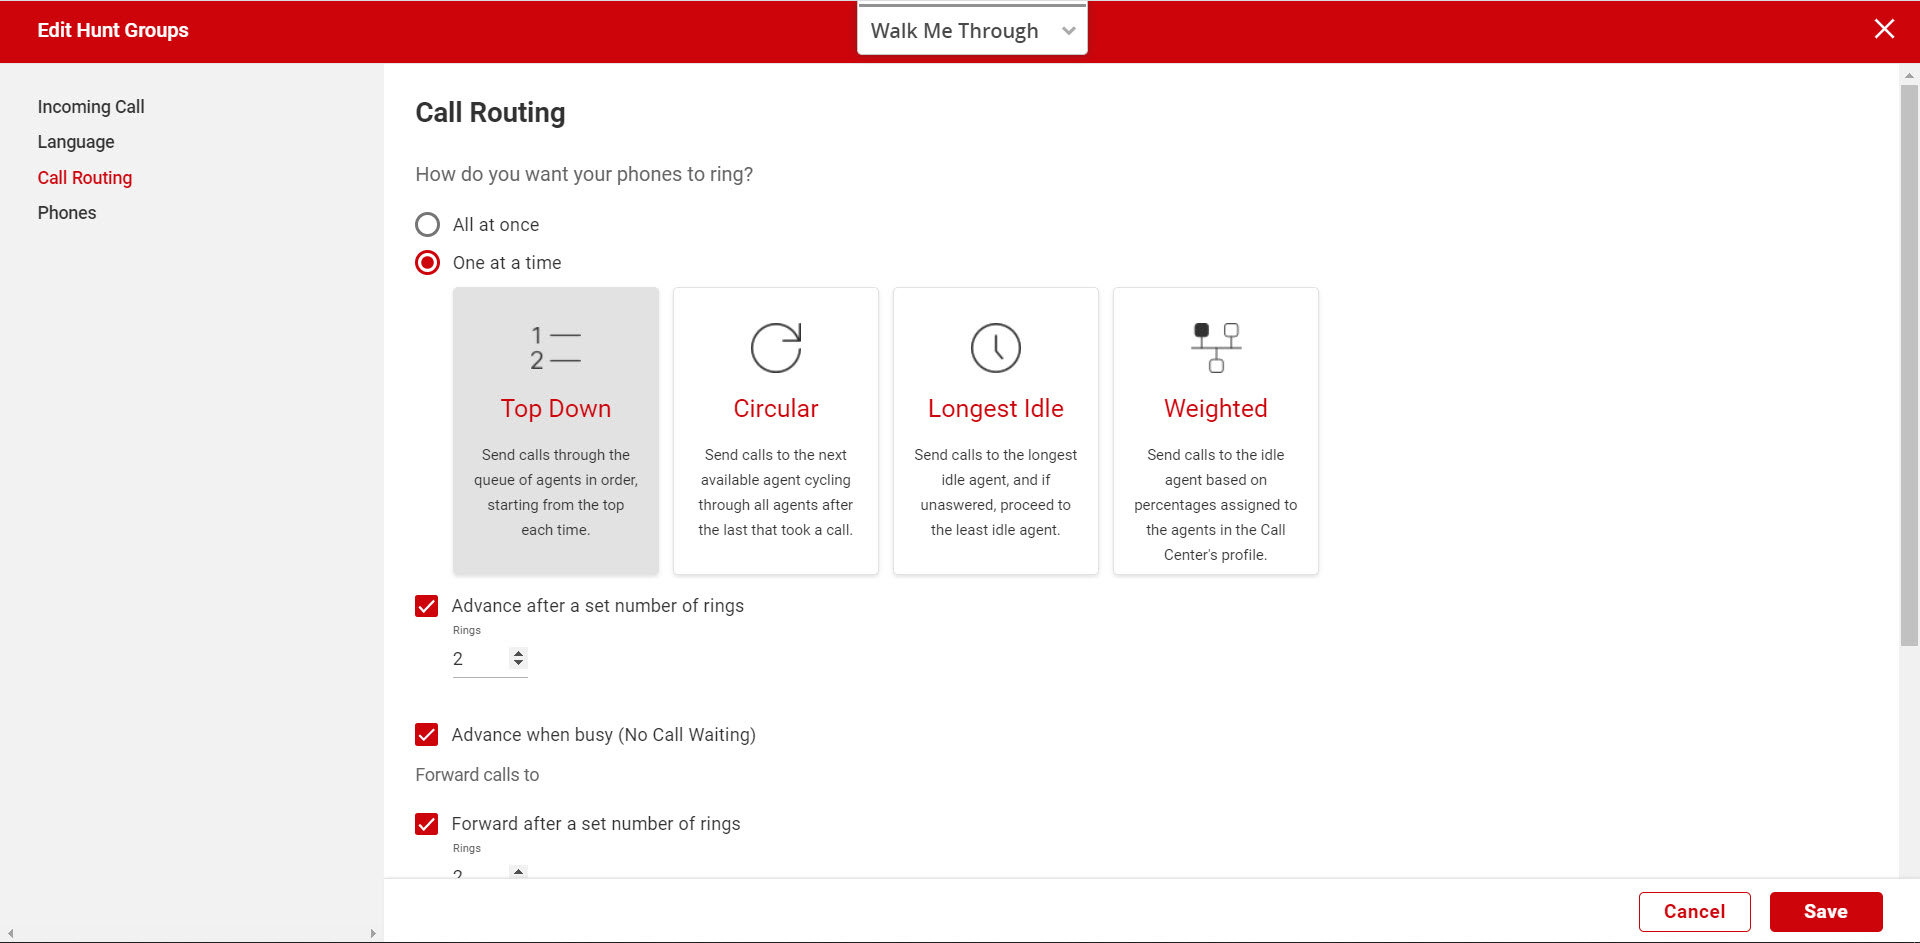
- Select how you want the phones to ring. Choose one of the following:
- All at once - Rings all users’ phones at the same time.
- One at a time - Rings users’ phones one at a time. If you select this option, select how you want the calls distributed.
- Select how you want call distributed. If you selected, one at a time, choose from the following options:
- Top Down - Ring the users one at a time, always starting with the same user and ringing in the same order. The user configured at the top of the “Assigned” list will ring first, followed by the users listed beneath, in sequential order.
- Circular - Ring the users one at a time, always ringing the users in the same order. The order of the users in the “Assigned” list represents the order in which the users’ phones will ring, beginning with the individual that follows the last user receiving a Hunt Group call.
- Longest Idle - Ring the user who has been idle (i.e., not on a hunt group call) the longest.
- Weighted - Route calls to users based on their pre-configured weight (percentage) assignments. If this option is selected, you must assign weights to the users. Once selected, you can set the weighted percentages. Use the slider to assign the percentages. The percentages must equal 100%. Users assigned a 0% weight will only receive calls if all other users are busy. Click Apply to save these changes.
- Select Advance when busy (No Call Waiting) if you would like call to forward to another user if the line is busy. Uncheck the box if you prefer that Hunt Group users on calls see additional incoming Hunt Group calls via Caller ID and are able to answer them while already on active Hunt Group calls.
- Check Advance after a set number of rings and enter the number of rings if you would like call to forward to another user if no one answers after a set number of rings. This represents number of rings per user.
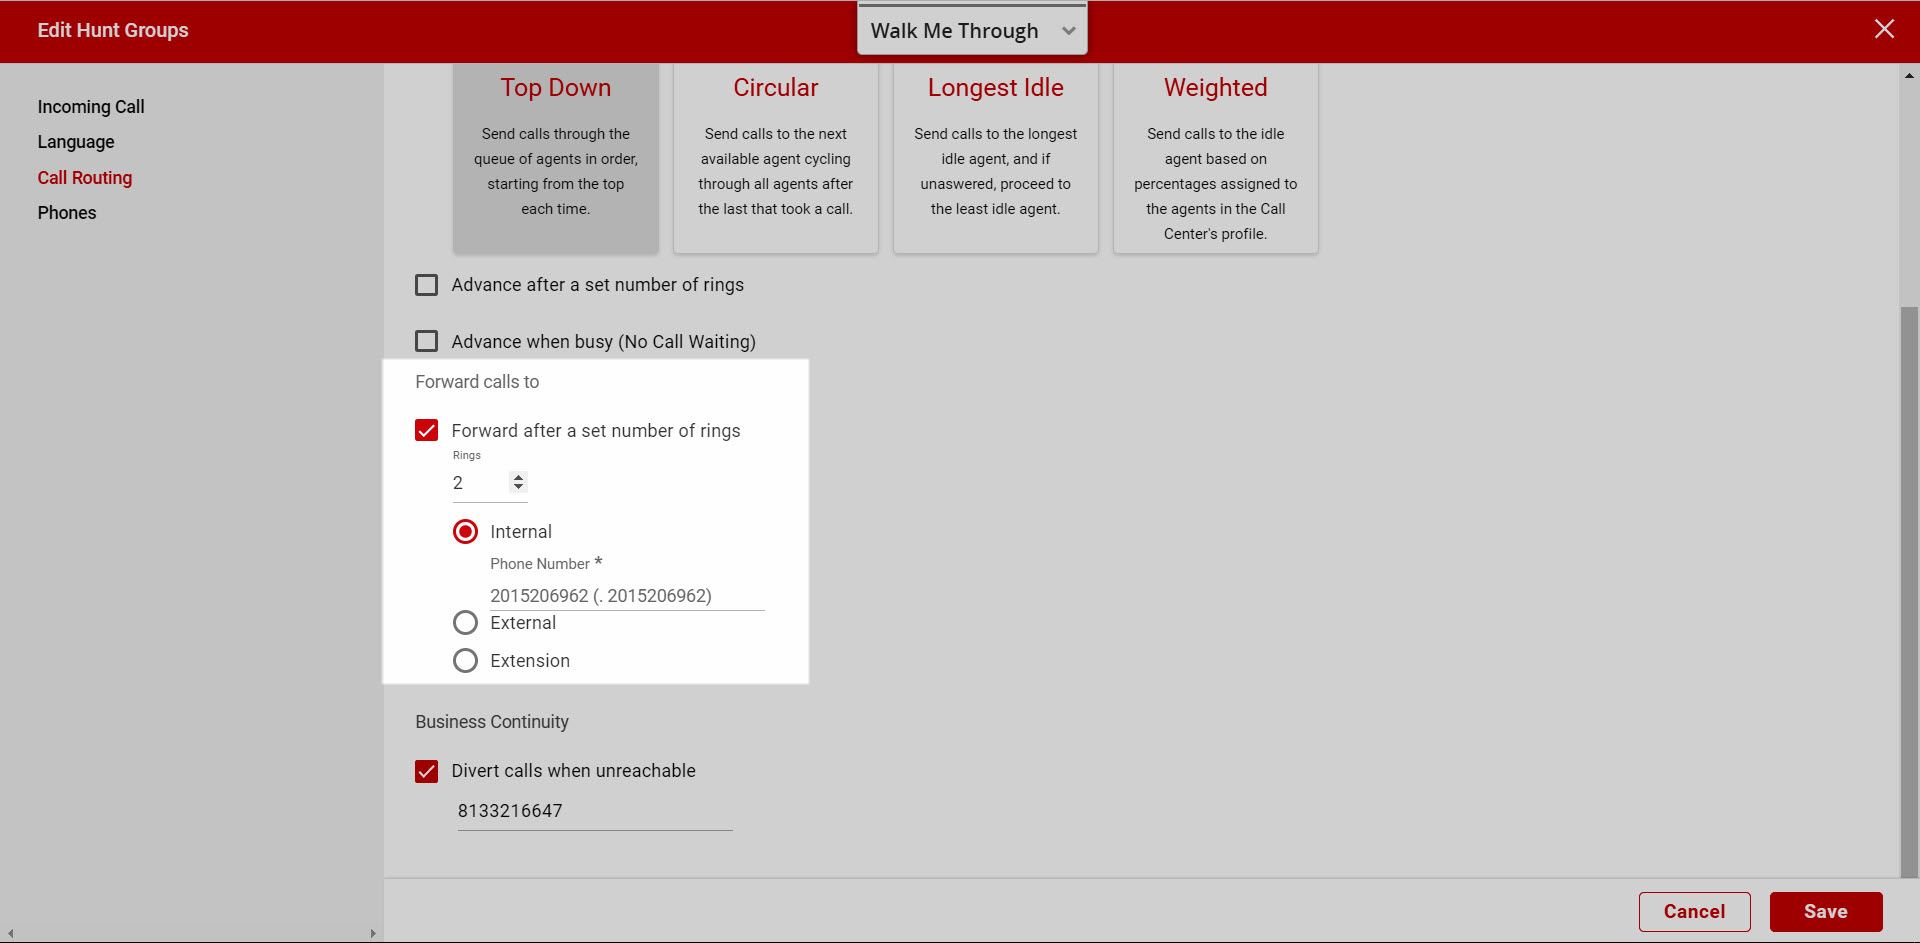
Configure hunt group forwarding settings
Hunt Group Forwarding settings are used to forward calls if none of the Hunt Group members is available to answer an incoming call.
- From the Edit Hunt Group page, on the Call Routing tab, you will see the Forwarding options.
- Check Forward after a set number of rings to enable forwarding if no one answers and enter the number of rings before forwarding. This is the total number of rings for all hunt group users.
- Next, select where you want calls forwarded: Internal, External or Extension.
- Internal Number - Select the internal number from the drop-down list.
- External Number - Enter the phone number of the external destination.
- Extension - Enter the extension. Check the Send to voicemail option to send calls to voice mail after the set number of rings. Note: The Send to voicemail option is only applicable for extensions.
- Select Save to save your changes.
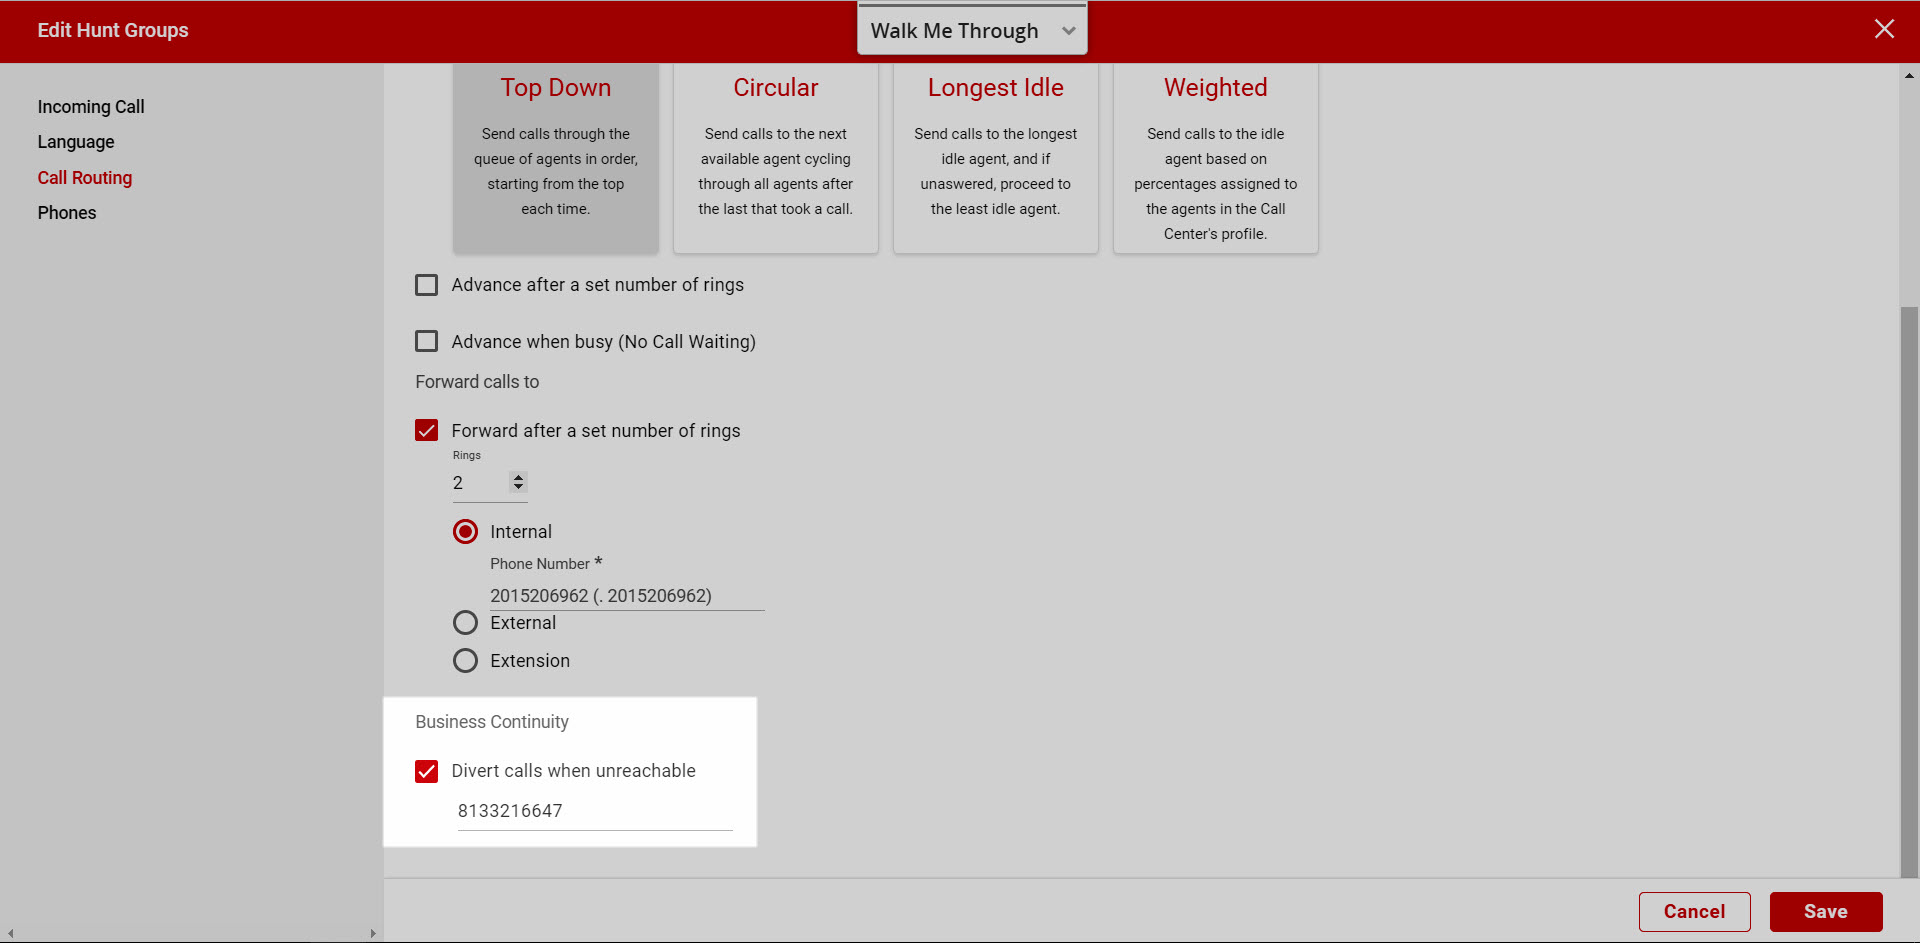
Hunt Group Business Continuity settings are used to forward calls if users within the Hunt Group cannot be reached. For example, if your office loses network connectivity, Business Continuity settings will be activated. A Hunt Group is busy when all users in the Hunt Group are on a call and there is no call waiting. If Call Waiting is enabled and every user has four active calls, that Hunt Group is busy.
- From the Edit Hunt Groups page, on the Call Routing tab, you will see the Business Continuity settings.
- Check Divert calls when unreachable and enter a number you want calls forwarded if users in the Hunt Group are not reachable (e.g., phone not connected to network) or the Hunt Group is busy.
- Select Save.
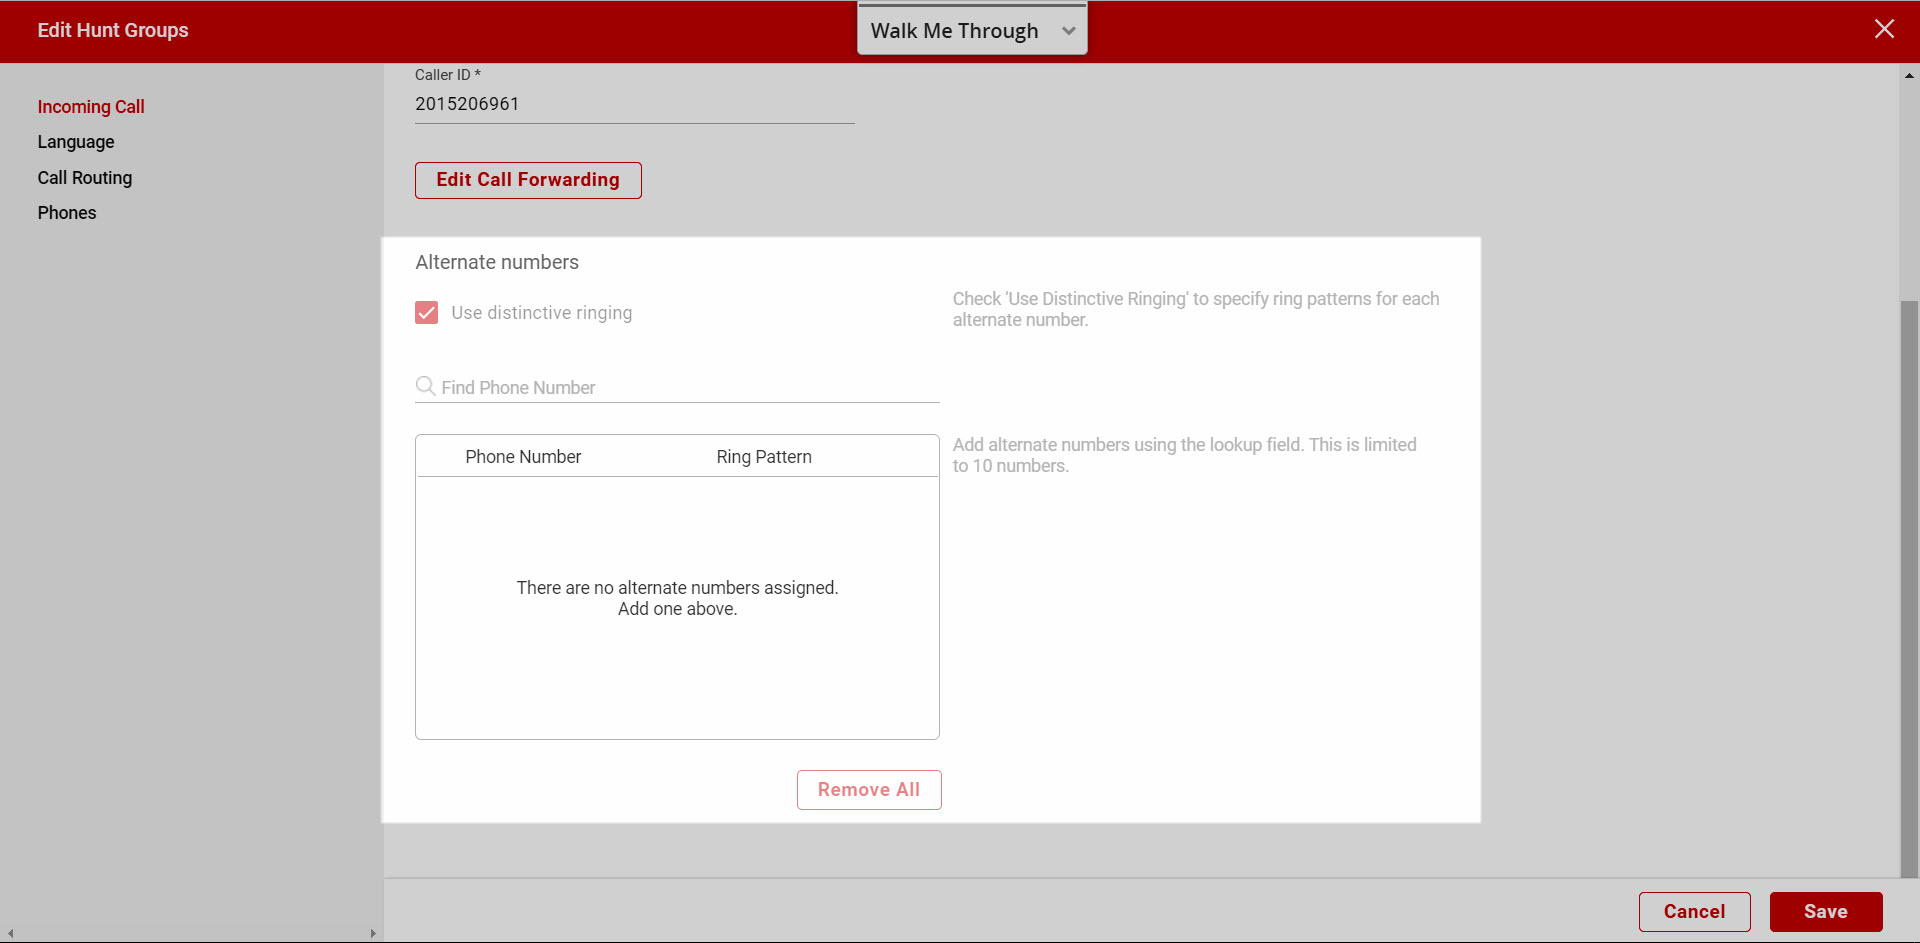
Adding alternate numbers
The Alternate Numbers feature allows you to assign multiple phone numbers or extensions to a Hunt Group. Each number will reach the same greeting and each menu will function identically to the main number. The alternate number option enables you to have up to ten (10) phone numbers ring in to the Hunt Group.
The alternate number option is found on the Incoming Call tab of the Edit Hunt Group window. To add an alternate number, follow these steps:
- Choose the number you would like to add in the Find Phone Number search field.
- If you would like to enable the distinctive ringing feature, check the box next to Use distinctive ringing. This will allow you to designate a different ringtone to play on the user's phone when receiving incoming calls from the alternate number.
- If distinctive ringing is enabled, select the unique ringtone from the drop-down menu next to the phone number.
- Select Save to save your changes.
Assigning users to the hunt group
Finally, assign available users to the Hunt Group in the Phones tab. The Available list allows you to view all available users to assign to the Hunt Group.
To assign users:
- Search for the user in the Find and Assign search box.
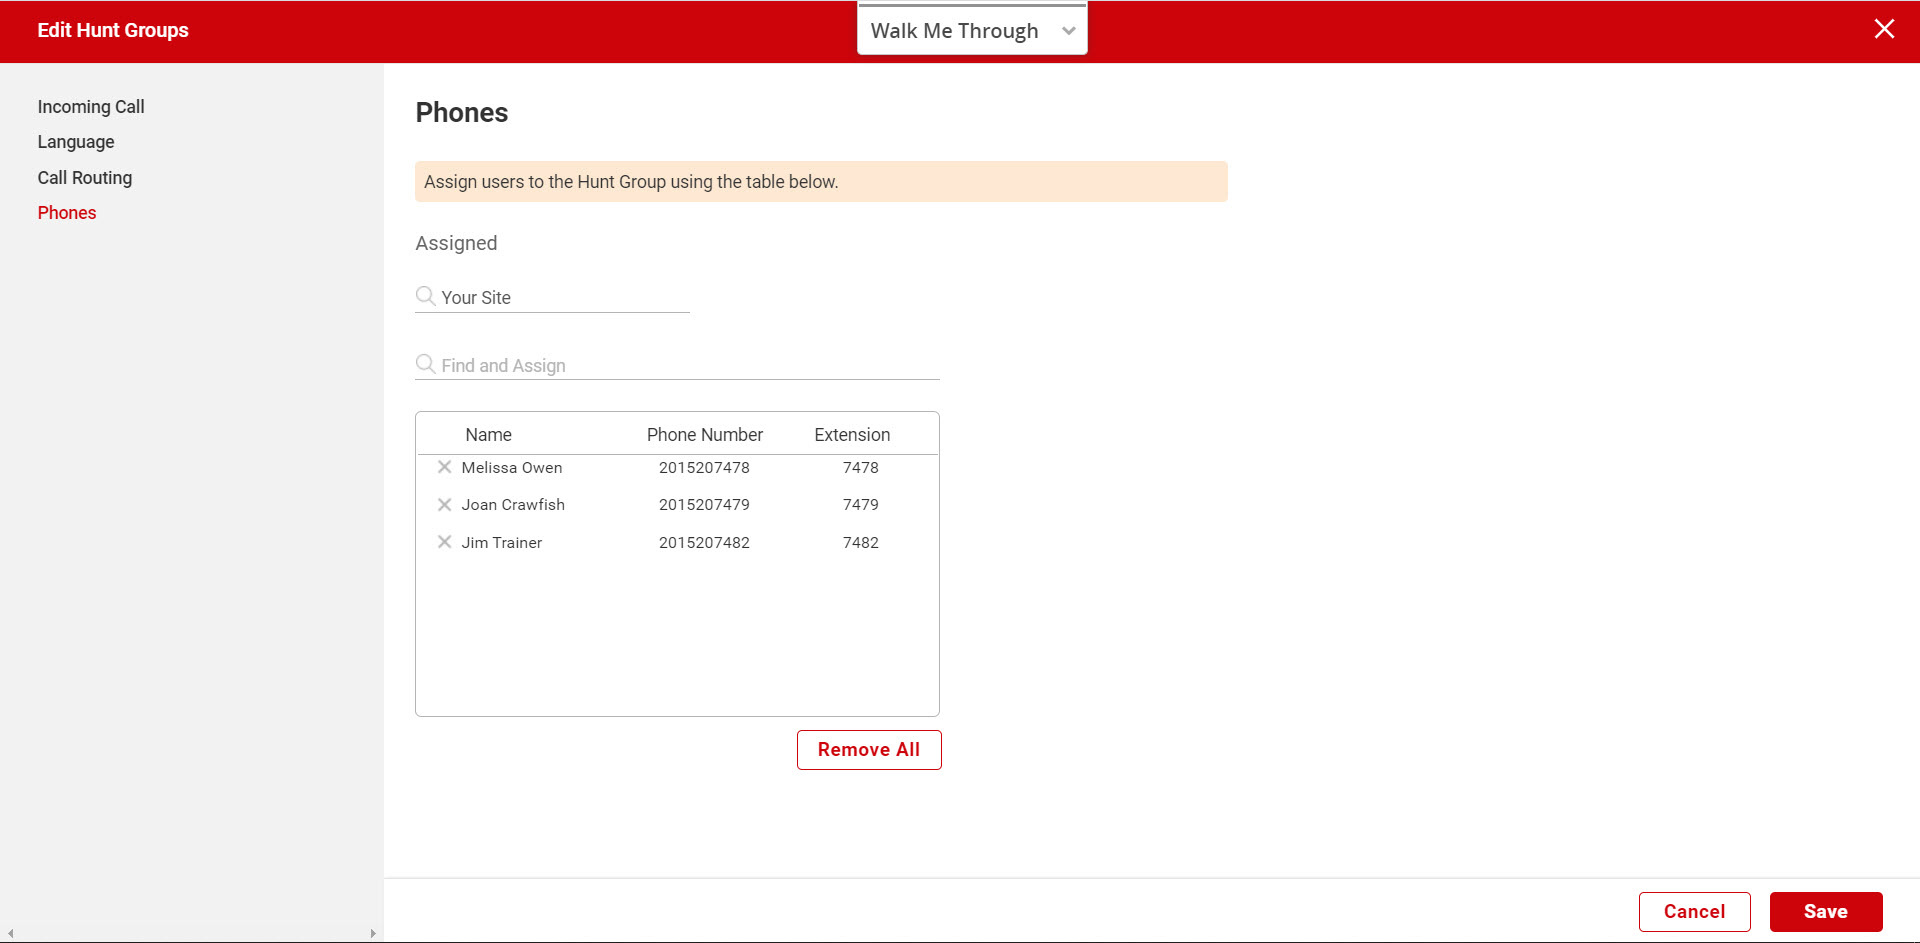
Note: The order the users are listed is important if the Call Routing Policy is configured to Circular or As Assigned.