


Time schedules
Time schedules are used to route incoming calls based on the day of the week and/or time of day. Schedules are classified as either business hours or holidays. Time schedules are mainly used for auto attendant purposes.
Schedule Notes:
- Upon install, two pre-defined schedules are assigned to your site. They are assigned to the site Auto Attendant function:
- Auto Attendant - Business: This schedule defines the days and hours your office is taking phone calls.
- Auto Attendant - Holiday: This schedule defines the days your office is closed due to a holiday and not taking phone calls.
- Schedules are defined by events. Events represent days of the week and times of the day.
- For proper Auto Attendant operation, verify that at least one event is defined in each of the pre-defined Auto Attendant schedules.
- If additional site schedules are defined, they will not impact Auto Attendant operation unless they are assigned to the Auto Attendant.
- If you expect to treat all incoming calls the same regardless of day or time, configuring a Time Schedule is unnecessary.
- During a Holiday Schedule, callers are routed based on the After Hours settings.
Modify time schedules
- Log in to the admin portal.
- From the Site drop-down menu, select your site.
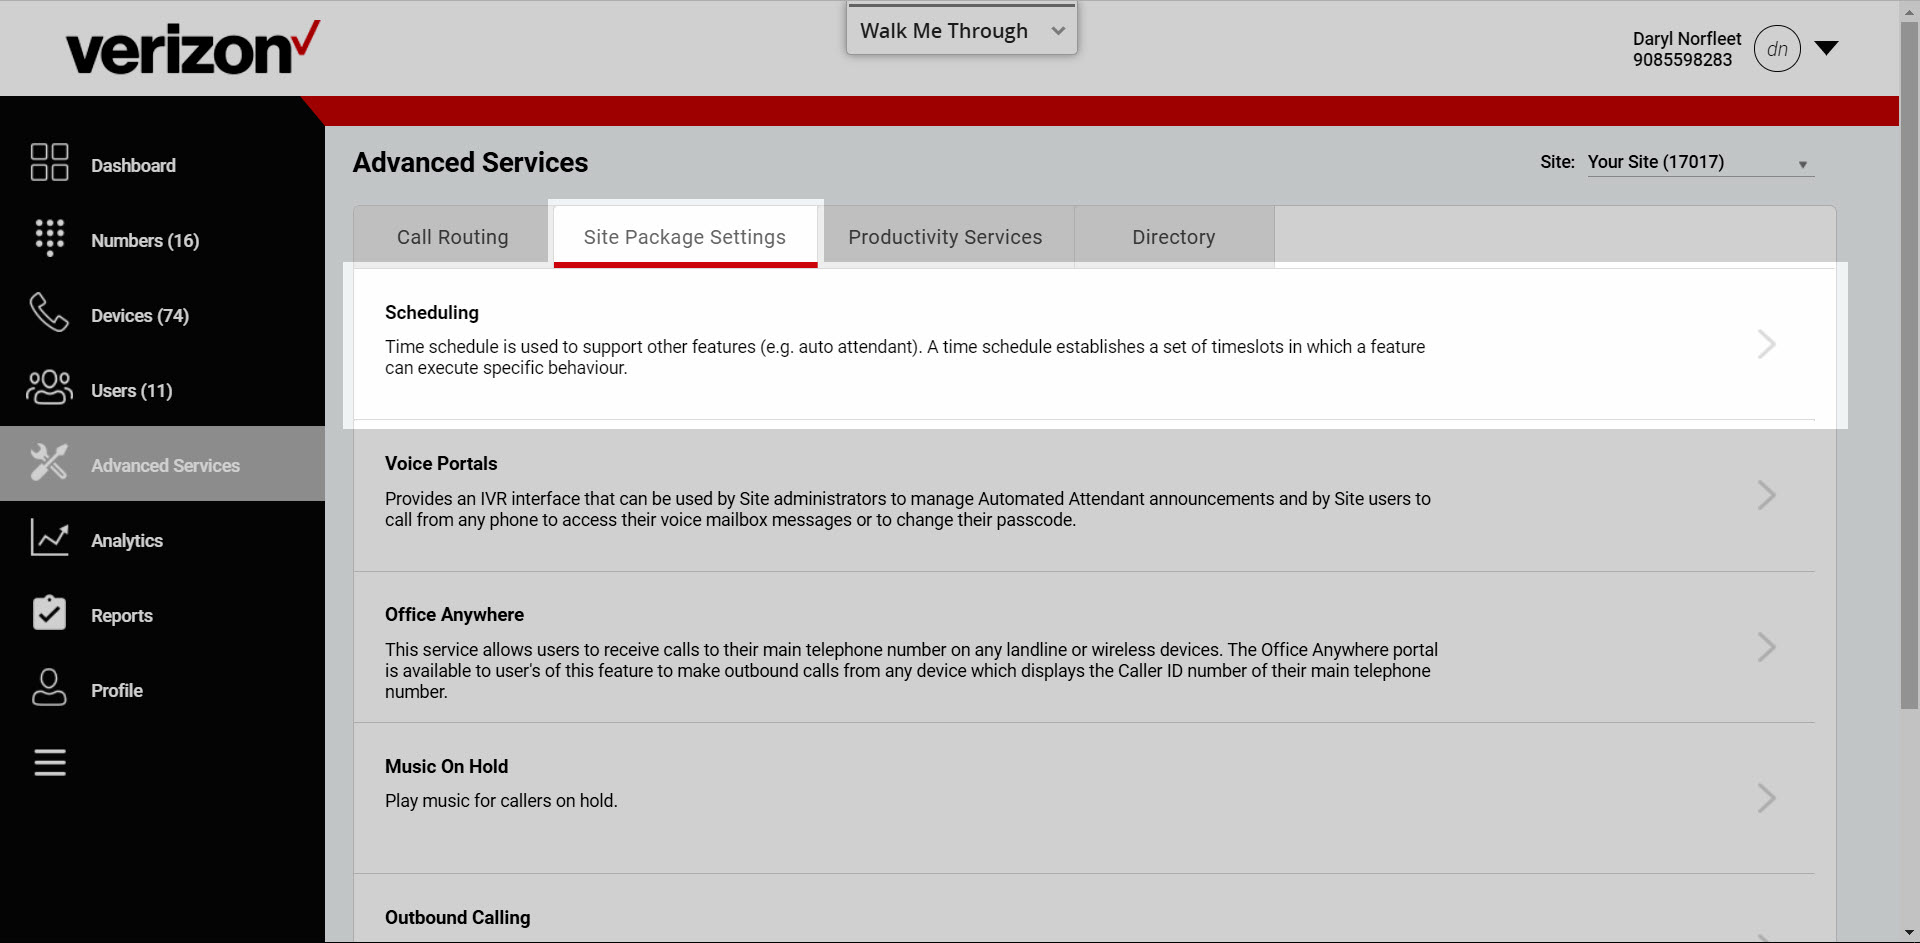
- Select the Advanced Services tab.
- Select Scheduling under Site Package Settings.
- Select the schedule to modify.
- Click Edit.
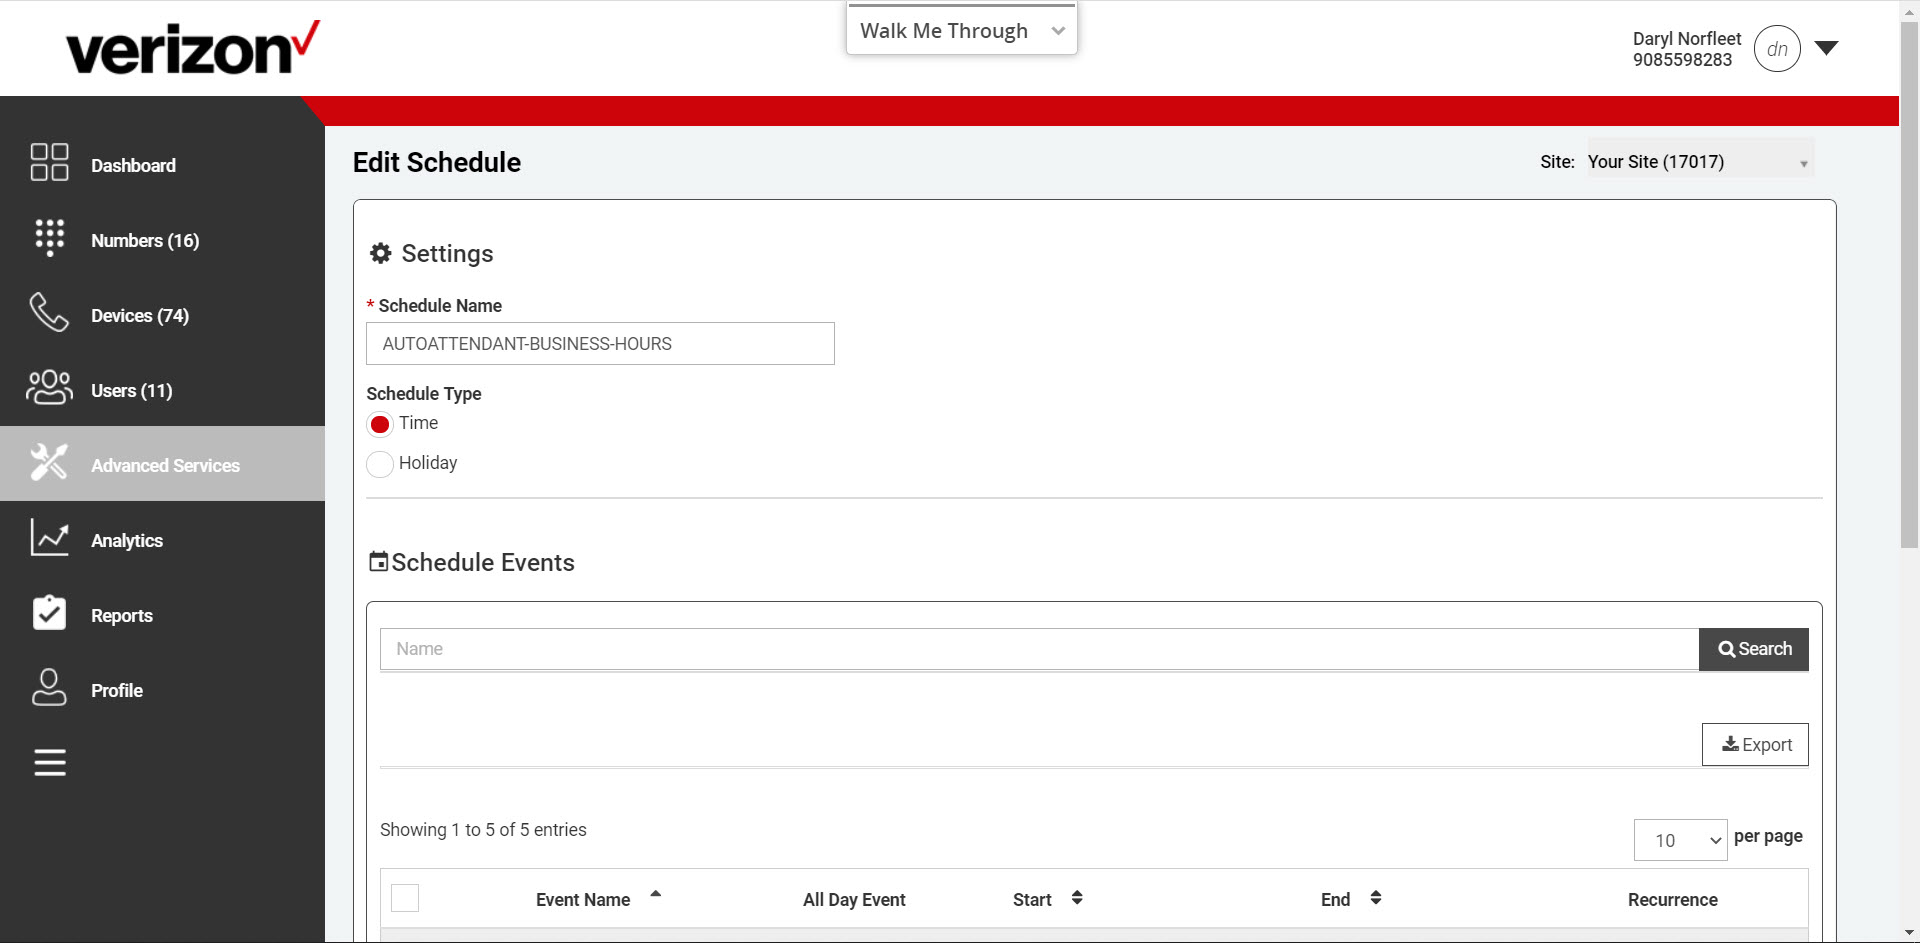
- To rename the schedule, enter the new name. Note: When modifying an existing schedule, you cannot change the Time or Holiday designation of the schedule.
- Click Save.
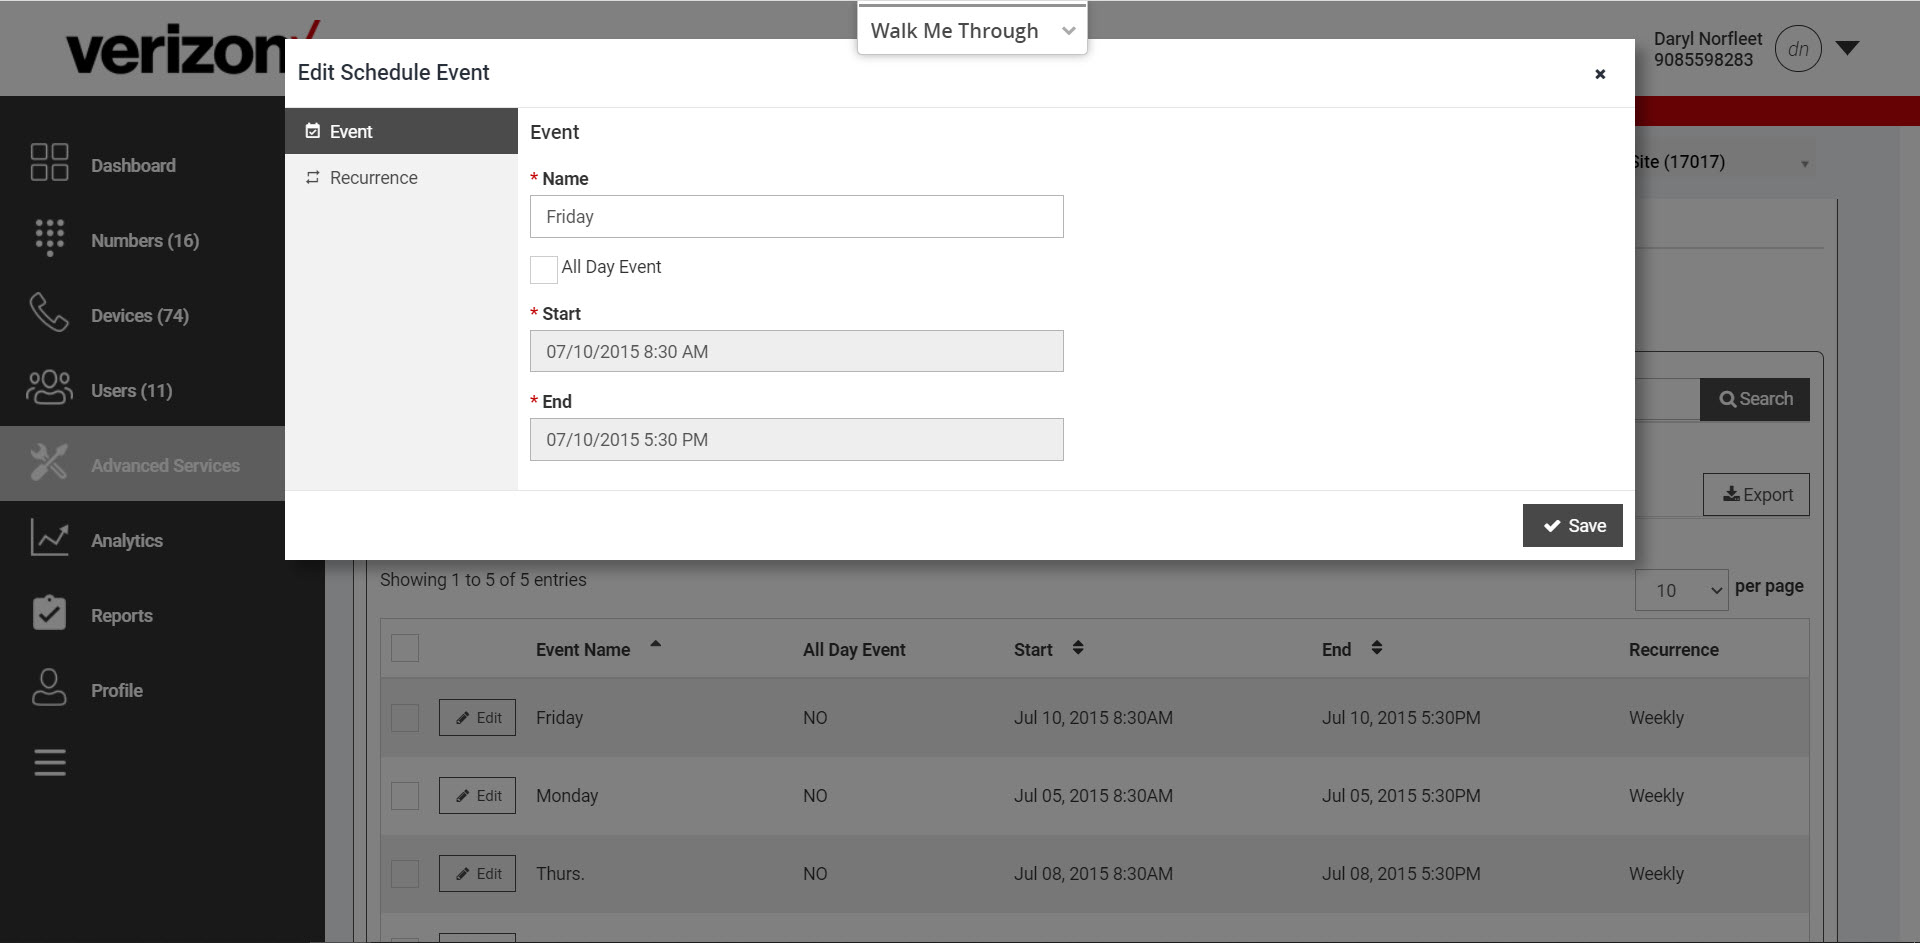
- To modify a scheduled event, select the event and click Edit.
- The Edit Schedule Event window appears.
- Modify where applicable:
- Edit the event name. This is typically the day of the week for the event.
- If this is an all-day event, check All Day Event.
- Modify the start date and start time for the event.
- Modify the end date and end time for the event. This represents your business hours for this day and when callers will hear your business hours greetings (for Auto Attendants). For example: Monday 9:00 am to Monday 5:00 pm.
- Next, select the recurrence pattern for this event under the Recurrence tab.
- Select None for an occasion outside of a holiday – perhaps a special event day at your office.
- Select the Weekly recurrence for events that should repeat each week on that day.
- Select the Yearly recurrence for holidays.
- Select the day of the week to have this schedule reoccur on that day every week.
- Edit the event name. This is typically the day of the week for the event.
- Select Save.
- Repeat steps for the remaining 6 days of the week.
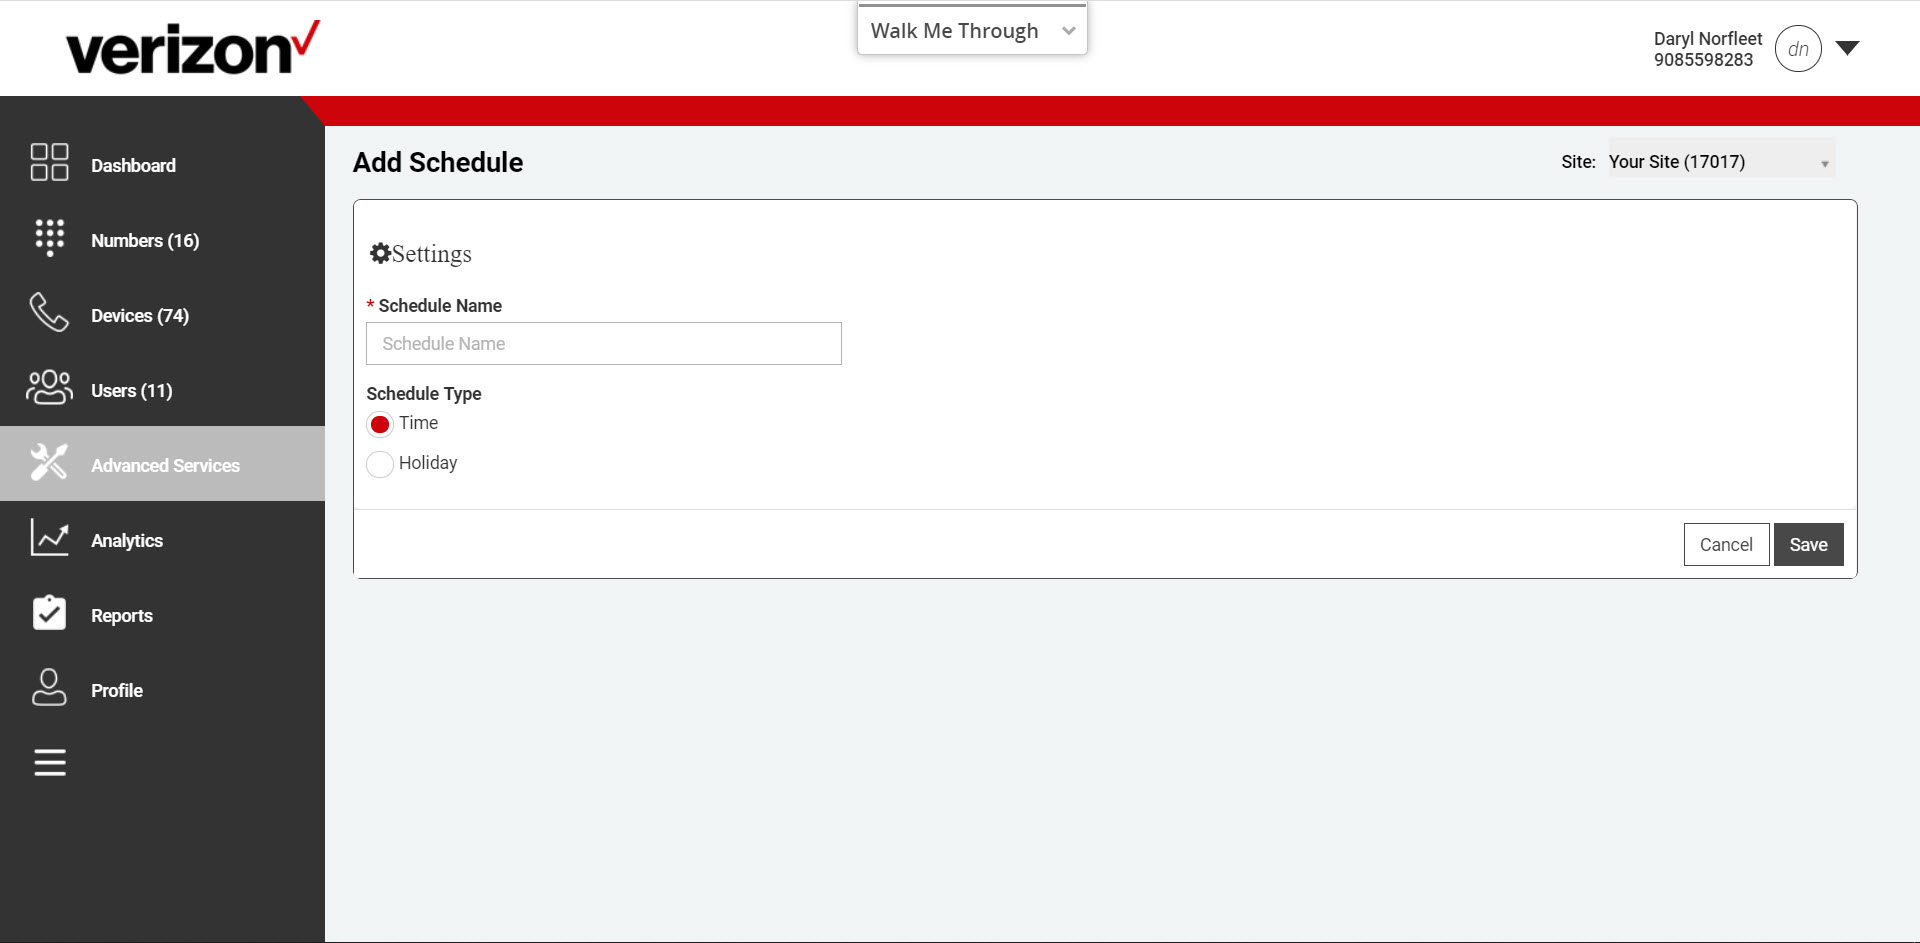
Add a time schedule
Additional schedules can be added and used by other features that may require unique business hours that are different than the normal business hours. To add a new time schedule, follow these steps:
- Log in to the admin portal.
- From the Site drop-down menu, select your site.
- Select the Advanced Services tab.
- Click Scheduling under Site Package Settings.
- Select the Add button.
- Enter the name of the schedule and select Time.
- Click Save.
- Select the new event and select Edit.
- Click Add to add an event.
- Enter the event name. This is typically the day of the week for the event.
- If this is an all day event, check All Day Event.
- Enter the start date and start time. If this is a recurring event, the start date can be the same.
- Enter the end date and end time for the event.
- Under the Recurrence tab, select the recurrence pattern for this event.
- Select None for an occasion outside of a holiday – perhaps a special event day at your office.
- Select the Weekly recurrence for events that should repeat each week on that day.
- Select the Yearly recurrence for holidays.
- Select the day of the week to have this schedule reoccur on that day every week.
- Click Save.
- Repeat steps for the remaining 6 days of the week.
- Assign the time schedule to its service.
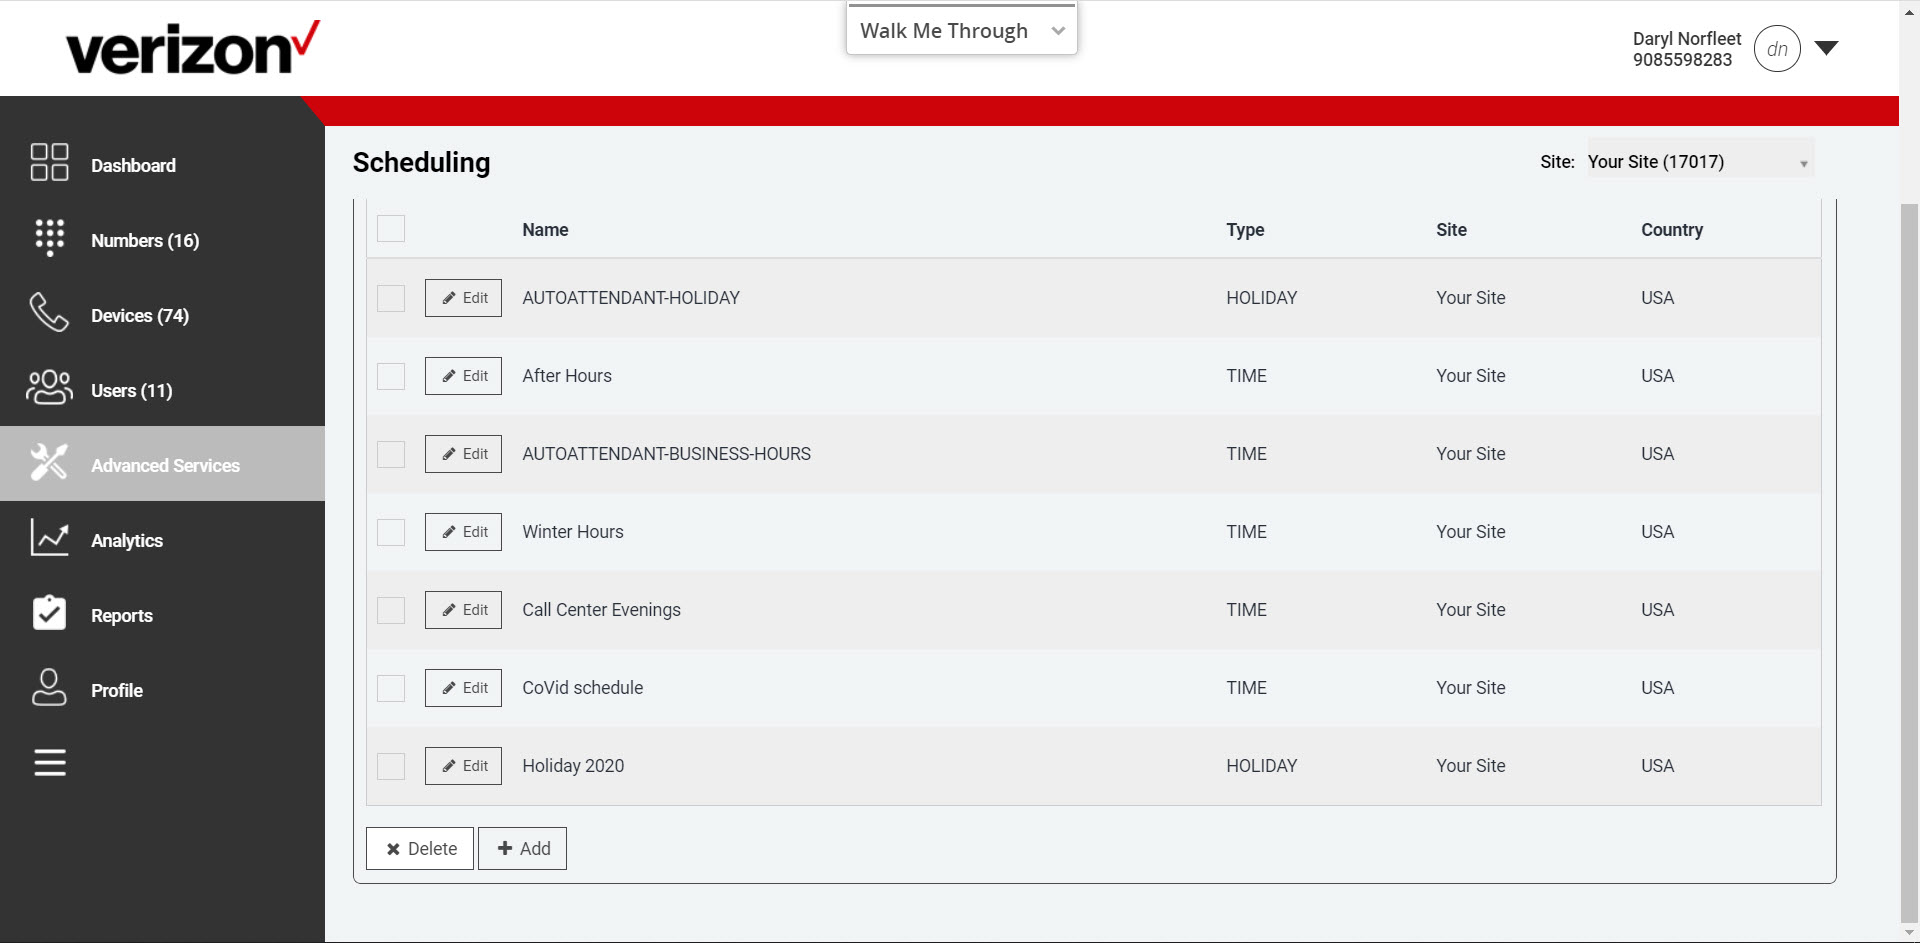
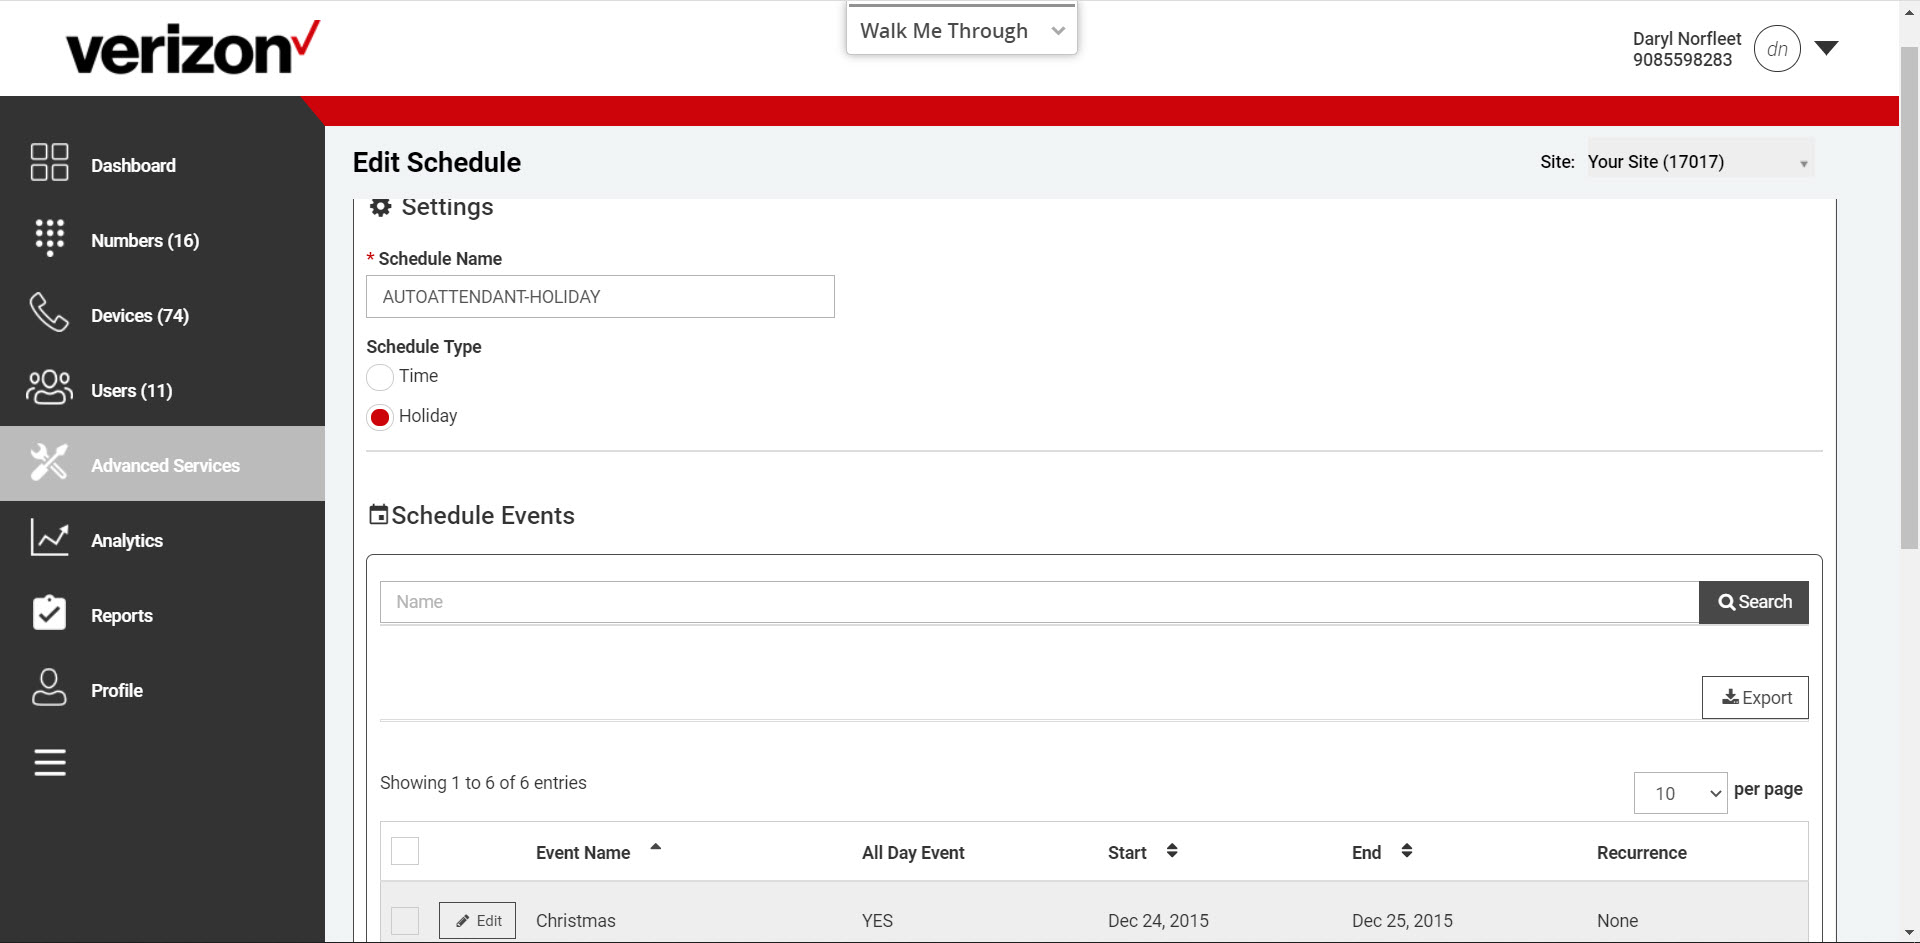
Modify/Add holiday schedules
Holiday Schedules contain multiple events. These events represent the holidays that your company is closed. It is recommended to create a new holiday schedule each year to ensure the dates and days in the schedule reflect when the offices are closed. If the holiday schedule is assigned to the Auto Attendant service, callers will be routed to the After Hours settings on your Auto Attendant.
- Log in to the admin portal.
- From the Site drop-down menu, select your site.
- Select Advanced Services tab.
- Select the Scheduling under Site Package Settings.
- Click the holiday schedule to modify and click Edit.
- To add a new holiday schedule click Add.
OR
- To rename the schedule, enter the new name. For example: Company Holidays. Note: When modifying an existing schedule, you cannot change the Time or Holiday designation of the schedule.
- Click Save.
- To modify an event, select the event and click Edit.
- Click Add to add new holiday events.
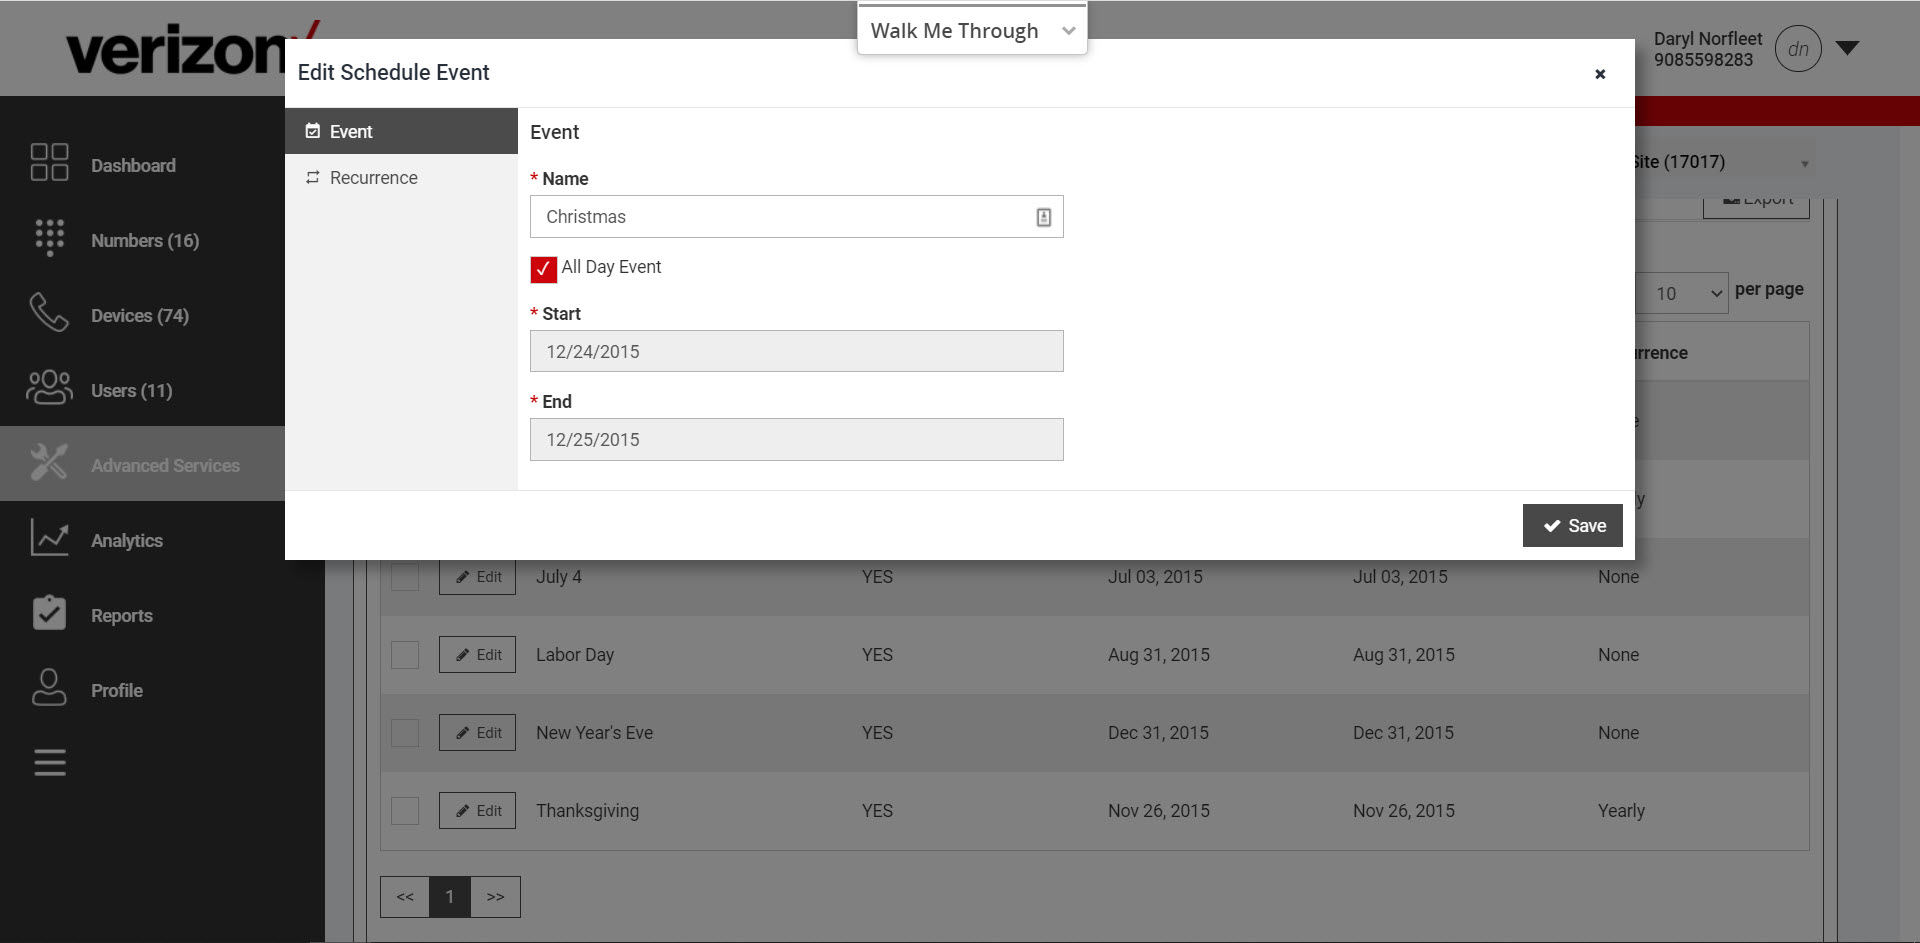
- The Edit Schedule Event window appears.
- Modify where applicable:
- Edit the event name. This is typically the name of the holiday.
- Select All day event if this holiday requires your office to be closed all day.
- Modify the start date and the end date. If this is an all-day event, just select the start day.
- Modify the start time and end time for the event. If this is an all-day event, these options will not apply.
- Select the recurrence pattern for this event.
- Select the Yearly recurrence for holidays.
- Select None for an occasion outside of a holiday – perhaps a special event day at your office.
- If yearly, select either the date of the holiday or the day of the month the recurrence will take place.
- Click Save.
- Repeat steps for any remaining holiday’s events on the schedule.
OR
Delete time or holiday schedules
- Log in to the admin portal.
- From the Site drop-down menu, select your site.
- Select Advanced Services from the left-hand navigation.
- Click Scheduling under Site Package Settings.
- Select the schedule to delete.
- Click Delete.